XplicitRecAI Wiki
Detailed documentation for XplicitRecAI: what each module does, how the processing pipeline works, and what every setting means. This wiki covers the Recording and Cutting modules and their settings pages. More tutorials will be added over time.
Overview
XplicitRecAI is a desktop application that records live cam shows from Chaturbate and Stripchat and automatically edits the recordings down to the highlights using AI detection.
The big picture
The application is built around two main modules that form a pipeline:
- Recording Module — monitors your list of performers, detects when they go
online, and records their live streams to disk. Recordings are saved per performer as
timestamped video files (mostly
.mp4) inside the Video Output Directory. - Cutting Module — scans an input directory (usually your recording output), merges recordings that were split, runs AI detection over the video frames, cuts out only the segments with action, and optionally converts the results to MP4.
AI detection classes
The AI models are trained on two detection classes:
- Class 0 — "pussy": explicit visual content.
- Class 1 — "bating": active masturbation.
Both the Recording module (in AI Bandwidth Save mode) and the Cutting module use these detections. With Process Only Specific Content enabled, only the "bating" class triggers processing; otherwise both classes count.
Editions
- Free Edition — recording only, no AI features. Many settings are fixed to safe defaults.
- Paid Edition — full feature set including AI detection, the Cutting module, custom models, and all advanced settings. A 7-day trial starts on first run.
Getting Started
From download to your first automatic highlight clip in a few minutes.
Installation
- Download the ZIP from the start page — Free Edition (recording only) or Paid Edition (full AI feature set, 7-day trial).
- Extract the ZIP to
C:\XplicitRecAI(recommended). - Run
XplicitRecAI.exe. The first start may take 30–60 seconds while .NET prepares in the background. - Accept the EULA and start your trial when prompted.
- If the tool does not start, check
_log\yyyy-MM-dd_App.logfor errors or contact support.
First run
- Make sure your system clock is accurate — recording and merging depend on it.
- Keep plenty of free disk space; the tool shuts down below 1 GB on the primary disk.
First configuration
- Open Recording Settings and set the Video Output Directory to a drive with lots of space (see File Paths).
- Decide on Weak Mode: leave it on for weak hardware (recording works without AI), or turn it off to enable AI-driven recording (see AI Detection).
- Go to the Recording page and add your first performers using their full
profile URL — the username alone is not enough (e.g.
https://chaturbate.com/performername/orhttps://stripchat.com/performername). New performers start in Force Record mode with Max quality — adjust per tile if needed. - Paid Edition: open Cutting Settings, point the Video Input Directory at your recording output and the Video Output Directory at your library folder (see File Paths).
- Do a dry run first — and use a small subset, not your whole collection: if you have a big collection, copy a few performer folders into a separate small test directory and point the input there. Enable Retain Original Videos, process those few files, and check the results before letting the Cutting module loose on the real collection (see Cutting Module).
Updating an existing installation
Updating is fully automatic — no manual downloading, extracting, or file replacement is needed.
- When a new version is available, an Update button appears in the application.
- Click it and confirm. The application downloads the latest updater directly from the website, showing a progress bar.
- The updater starts automatically, closes XplicitRecAI (and Guardian), installs the new version, and you're done — settings, configuration files, and recordings are preserved.
Recording Module
The Recording page is the heart of the application: it manages every performer you want to record, shows their live status, and controls the actual stream capture.

What it does
- Performer management — add performers via their full Chaturbate or Stripchat
profile URL (e.g.
https://chaturbate.com/performername/). Each performer gets a tile with a live preview image, current room state (online/offline), recording state, and per-performer controls. - Automatic status monitoring — the app polls the cam site APIs at a configurable interval to detect when a performer goes online, then starts recording automatically (when Autostart Recording is enabled).
- Sequence-based capture — live streams are downloaded as short HLS video sequences. The tile shows live statistics: download speed, current sequence, failed vs. successful sequence writes, FPS, and resolution. If too many sequences fail in a row (default: 8 of the last 12), the recording restarts automatically to stay in sync with the server.
- Per-performer actions — each tile has buttons to open the performer's log
file or configuration file, pause/resume recording, and a globe icon to open the performer's
room. Middle-clicking the globe opens a custom web search (see
CustomWebSearchQueryURLin the settings), which is handy for jumping straight to your Stash library. - Filtering, sorting & pagination — filter the performer list by text or with
hashtag filters:
#cb/#sc(by cam site),#rec/#!rec(recording / not recording). Auto-sorting keeps the list ordered, and Items Per Page controls how many tiles are shown. - Performer ratings — rate performers from 1 to 5 stars directly on their tiles.
- Tor status — a banner in the Recording view shows the live Tor connection state (API requests are routed through Tor by default); if Tor fails to start, the banner points you to the log.
Recording Modes
Every performer has a recording mode that decides when the stream is captured:
| Mode | Badge | Behavior |
|---|---|---|
| Force Record | Always on | Records the full show whenever the performer is online, regardless of what is happening on stream. This is the default mode for newly added performers. |
| AI Bandwidth Save Record | Turquoise | The AI watches the preview images and only records while action ("pussy" / "bating") is detected. If no detection occurs for the configured gap time (default: 360 seconds), the recording stops until the AI detects action again. This saves large amounts of bandwidth and disk space during idle chat periods. Requires Weak Mode to be off and benefits greatly from GPU acceleration. |
| Recording Paused | Paused | The performer stays in your list and their status is still monitored, but nothing is recorded. |
Target Quality
Each performer has a target quality. The recorder picks the stream variant closest to your target from what the performer actually broadcasts:
480p 30 FPS/480p 60 FPS720p 30 FPS/720p 60 FPS1080p 30 FPS/1080p 60 FPSMax— always take the highest quality available (default for new performers).
Output files
Finished recordings are written to the Video Output Directory, one subfolder per performer, with timestamped filenames:
VideoOutputDirectory
├── Performer_01
│   ├── Performer_01-2025-06-18_02-00.mp4
│   └── Performer_01-2025-06-18_04-00.mp4
└── Performer_02
    └── Performer_02-2025-06-18_04-00.mp4
Recordings are downloaded and written as MP4; only older versions of the tool produced
.ts files. This structure is exactly what the Cutting module expects as its input, so
you can point the cutting input directory at the recording output directory for a fully automatic
pipeline.
Filename markers (why a recording ended)
When a recording stops, a short marker is added to the filename that tells you exactly why it ended:
| Marker | Meaning |
|---|---|
.id. |
Performer was deleted from your list. |
.is. |
The tool was shut down. |
.wnp. |
Went non-public — the performer went offline, private, away, etc. |
.rp. |
Recording was paused. |
.rtrrm. |
The room-title recording rule validator canceled the recording. |
.desge. |
Detection Event Split Gap exceeded (Turquoise mode stopped after no AI detection). |
.rroelh. |
Restart-recording-on-error level was hit (too many failed sequences). |
.tqc. |
Target quality was changed, which restarts the recording. |
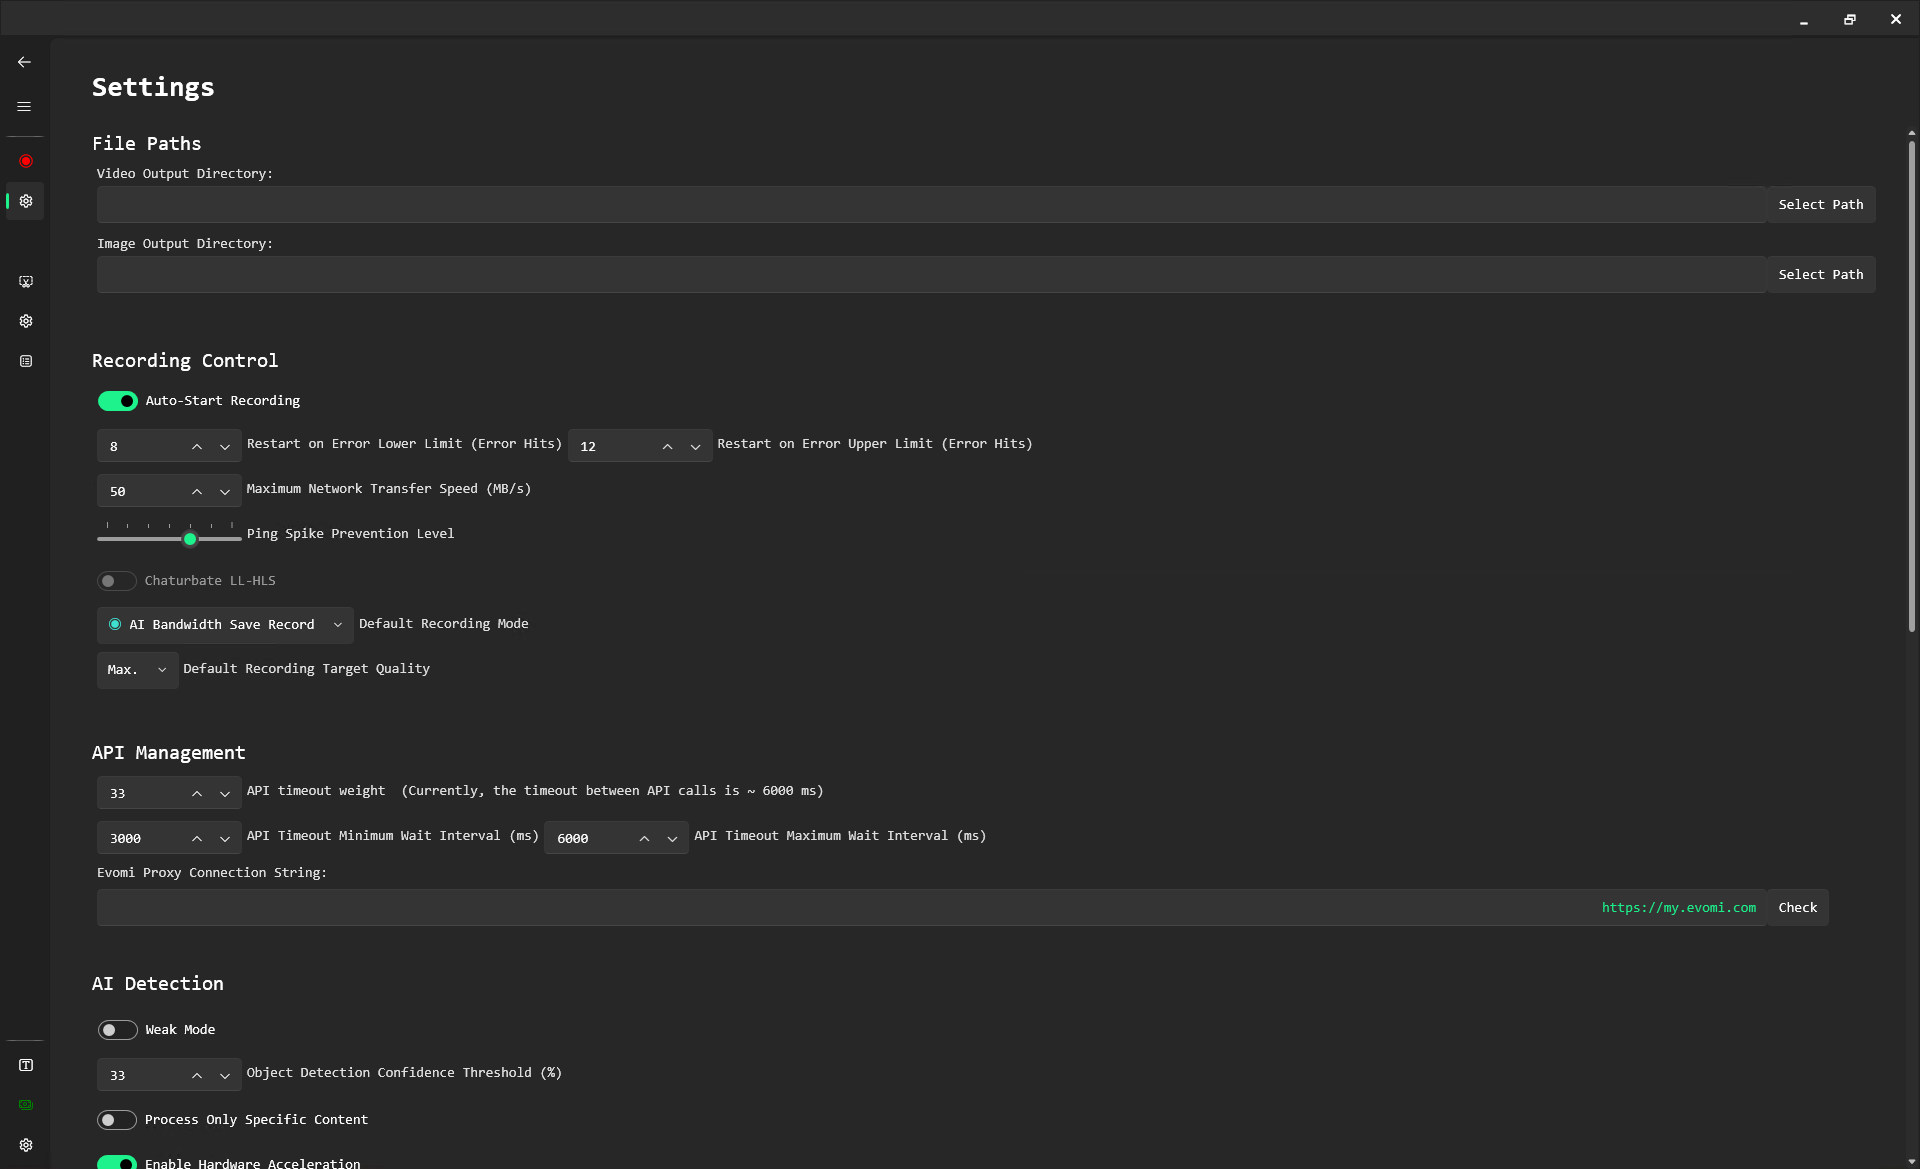
Recording Settings
Everything that controls how streams are captured lives on the Recording Settings page. The tables below list each setting with its default value and what it actually does.
File Paths
| Setting | Default | Description |
|---|---|---|
| Video Output Directory | _Recordings | The folder where recorded video files are saved after recording. If the configured
folder cannot be created or accessed, the app falls back to
_Recordings next to the application.
|
| Broken Video Output Directory | _BrokenRecordings | Folder for recordings that fail ffmpeg processing. Leave blank to use the default
_BrokenRecordings folder next to the application.
|
| Image Output Directory | (blank) | The folder where snapshot images from your recordings are saved (e.g. when clicking a preview image with save-on-click enabled). |
| Temporary File Recording Directory | _TemporaryFiles | Folder for temporary recording files while a stream is being captured. Use a fast SSD, not a high-latency network share. Experimental — most users don't need to change it. |
Recording Control
| Setting | Default | Description |
|---|---|---|
| Autostart Recording | on | Automatically start recording performers when the application launches. |
| Restart Recording On Error (lower limit) | 8 | Number of failed sequences out of the checked window that triggers a recording restart. Keeps recordings in sync with the server when errors accumulate. |
| Restart Recording On Error (upper limit) | 12 | Total number of recent sequences checked for errors. With the defaults, 8 failures out of the last 12 sequences restart the recording. |
| Maximum Network Transfer Speed | 50 MB/s | Caps the speed at which finished recordings are moved to the output folder or network share, so the transfer doesn't starve active recordings. |
| Ping Spike Prevention | 0 | Smooths out sequence downloads to reduce ping spikes — useful when you share the connection with gaming or other latency-sensitive apps. Higher values may cause more sequence loss during recording. Changes apply live to all active recordings and reset their download-time statistics. |
| Default Recording Mode | Force Record | The recording mode assigned to newly added performers. |
| Default Target Quality | Max | The target quality assigned to newly added performers. |
| Use Tor | on | Sends API requests through the Tor hidden service. Only API requests are routed through Tor — images, video, and audio downloads are not. |
| Tor Exit Country | us | Country code for the Tor exit node. Pick a country that does not enforce age verification (unlike, e.g., Mexico). |
Chaturbate & Stripchat Settings
Both cam sites have an identical group of settings, tuned independently:
| Setting | Default | Description |
|---|---|---|
| Preview Image Refresh Interval | 5000 ms | How often preview images refresh. Lower values give more frequent updates at the cost of resources. In AI Bandwidth Save mode every refresh triggers an AI detection, so a low interval can seriously degrade performance — 5000 ms is recommended for low-performance systems. |
| API Timeout Weight | 33% | Percentage by which API timeouts grow or shrink when the site reports too many requests. |
| API Timeout Minimum Wait Interval | CB 3000 / SC 1000 ms | Minimum wait between API calls that check performer status. |
| API Timeout Maximum Wait Interval | CB 6000 / SC 3000 ms | Maximum wait between API calls that check performer status. |
| Evomi Proxy Connection String | (blank) | Optional Evomi residential-proxy connection string. Routes API traffic through residential IPs to reduce "429 Too Many Requests" errors. |
| Stripchat Unencrypted (Stripchat only) | on | Use Stripchat's unencrypted servers for stream downloads. |
AI Detection
| Setting | Default | Description |
|---|---|---|
| Weak Mode | on | Turns off AI detection during recording to keep performance strong on low-resource systems. While enabled, performers in AI Bandwidth Save mode are treated as Force Record — turning it on immediately starts recording those performers, and turning it off makes their idle recordings stop again shortly after. Disable it on capable hardware to use AI-driven recording; on startup the app also runs a background benchmark and suggests the recommended mode if eligible. |
| Object Detection Confidence Threshold | 33% | Detections below this confidence are ignored. Raise it to reduce false positives, lower it to catch more borderline moments. |
| Process Only When Specific Content Detected | off | Record only when the "bating" class is detected, ignoring other detections. |
| Hardware Acceleration | on (if GPU found) | Uses your NVIDIA GPU for much faster AI detection. Falls back to slower CPU processing without a compatible GPU/drivers. Restart the app after changing. See the GPU Setup guide. |
| Model | default.onnx | The detection model to use. Custom models go into the CustomModels
folder (never named default.onnx). Model changes apply after an app
restart if a recording is active. |
| Detection Event Split Gap | 360 s | For performers in Turquoise (AI Bandwidth Save) mode: how long a recording keeps running without a new AI detection before it stops. |
User Interface & Preview
These toggles control what is shown on each performer tile — username, room state, recording state, quality, FPS, resolution, download speed, sequence statistics (current sequence, last/average download time, successful vs. failed writes), image update timings, and the last room-state check. Turning off what you don't need declutters the tiles and slightly reduces UI load. Additional options:
| Setting | Default | Description |
|---|---|---|
| Show Preview Image | on | Displays the live preview image on each tile. |
| Allow Preview Image Save On Click | off | Saves the preview image to the Image Output Directory when clicked. |
| Show All Buttons | on | Shows the extra action buttons on each tile (open log, open config file, etc.). Automatically disabled when the preview image scale is set very small. |
| Preview Image Scale | 6 | Negative scale factor for tile preview images — lower values make images larger. |
| Items Per Page | 8 | Number of performer tiles shown per page. |
| Default Filter | (blank) | Text filter applied to the performer list on startup. |
| Custom Web Search Query URL | http://127.0.0.1:9999/scenes?q={0} | URL template opened when middle-clicking a tile's globe icon; {0} is
replaced with the performer's username. The default targets a local Stash
instance. |
| User Agent | Chrome on Windows | The user agent string used for web requests. |
| Show NASA Warning | on | Shows the "NASA server needed" danger alert in the snackbar when more than 42 filtered performers are displayed at once, including the item count. |
| Show Autosort Hint | on | Shows a snackbar reminder when auto-sorting of the performer list could apply but is disabled, and controls the pop-up hint when auto-sorting switches off. |
At the bottom of the page, Show Advanced Settings reveals the options intended for experienced users (hidden by default), and Highlight Advanced Settings visually marks that section so advanced options are easy to distinguish.
Cutting Module
The Cutting module turns raw multi-hour recordings into compact highlight clips. It merges split recordings, scans them with the AI, cuts out only the parts with action, and optionally converts everything to MP4 — fully automatically.
Input requirements
The module works on any folder that follows the performer-subfolder layout (which the Recording module produces automatically):
InputDirectory
├── Performer_01
│   ├── Performer_01-2025-06-18_02-00.mp4
│   └── Performer_01-2025-06-18_04-00.mp4
└── Performer_02
    ├── Performer_02-2025-06-18_04-00.mp4
    └── Performer_02-2025-06-18_07-00.mp4
Supported containers: .mp4, .ts, .mkv, .mov,
.avi, .wmv, .flv, .m4v. Only
.ts, .mp4, and .mkv are heavily tested and reliable.
The processing pipeline
- Scan — the input folder is checked on an interval (default: every 180 seconds). Files are only picked up when they are done being written and older than the Minimum File Age (default: 8 hours), so shows that are still running are never processed half-finished.
- Merge split recordings — recordings that belong to the same show are merged based on file metadata: if the gap between one file's last-modified time and the next file's creation time is within the Video Merge Gap (default: 180 seconds), they are joined. Only files from the same performer subfolder are ever merged. Optionally a visual indicator (loading circle) is inserted where the splits occurred.
- Rewrite (optional) — original videos can be rewritten to fix missing frames from live recordings, which keeps frame numbering and detection timestamps perfectly aligned.
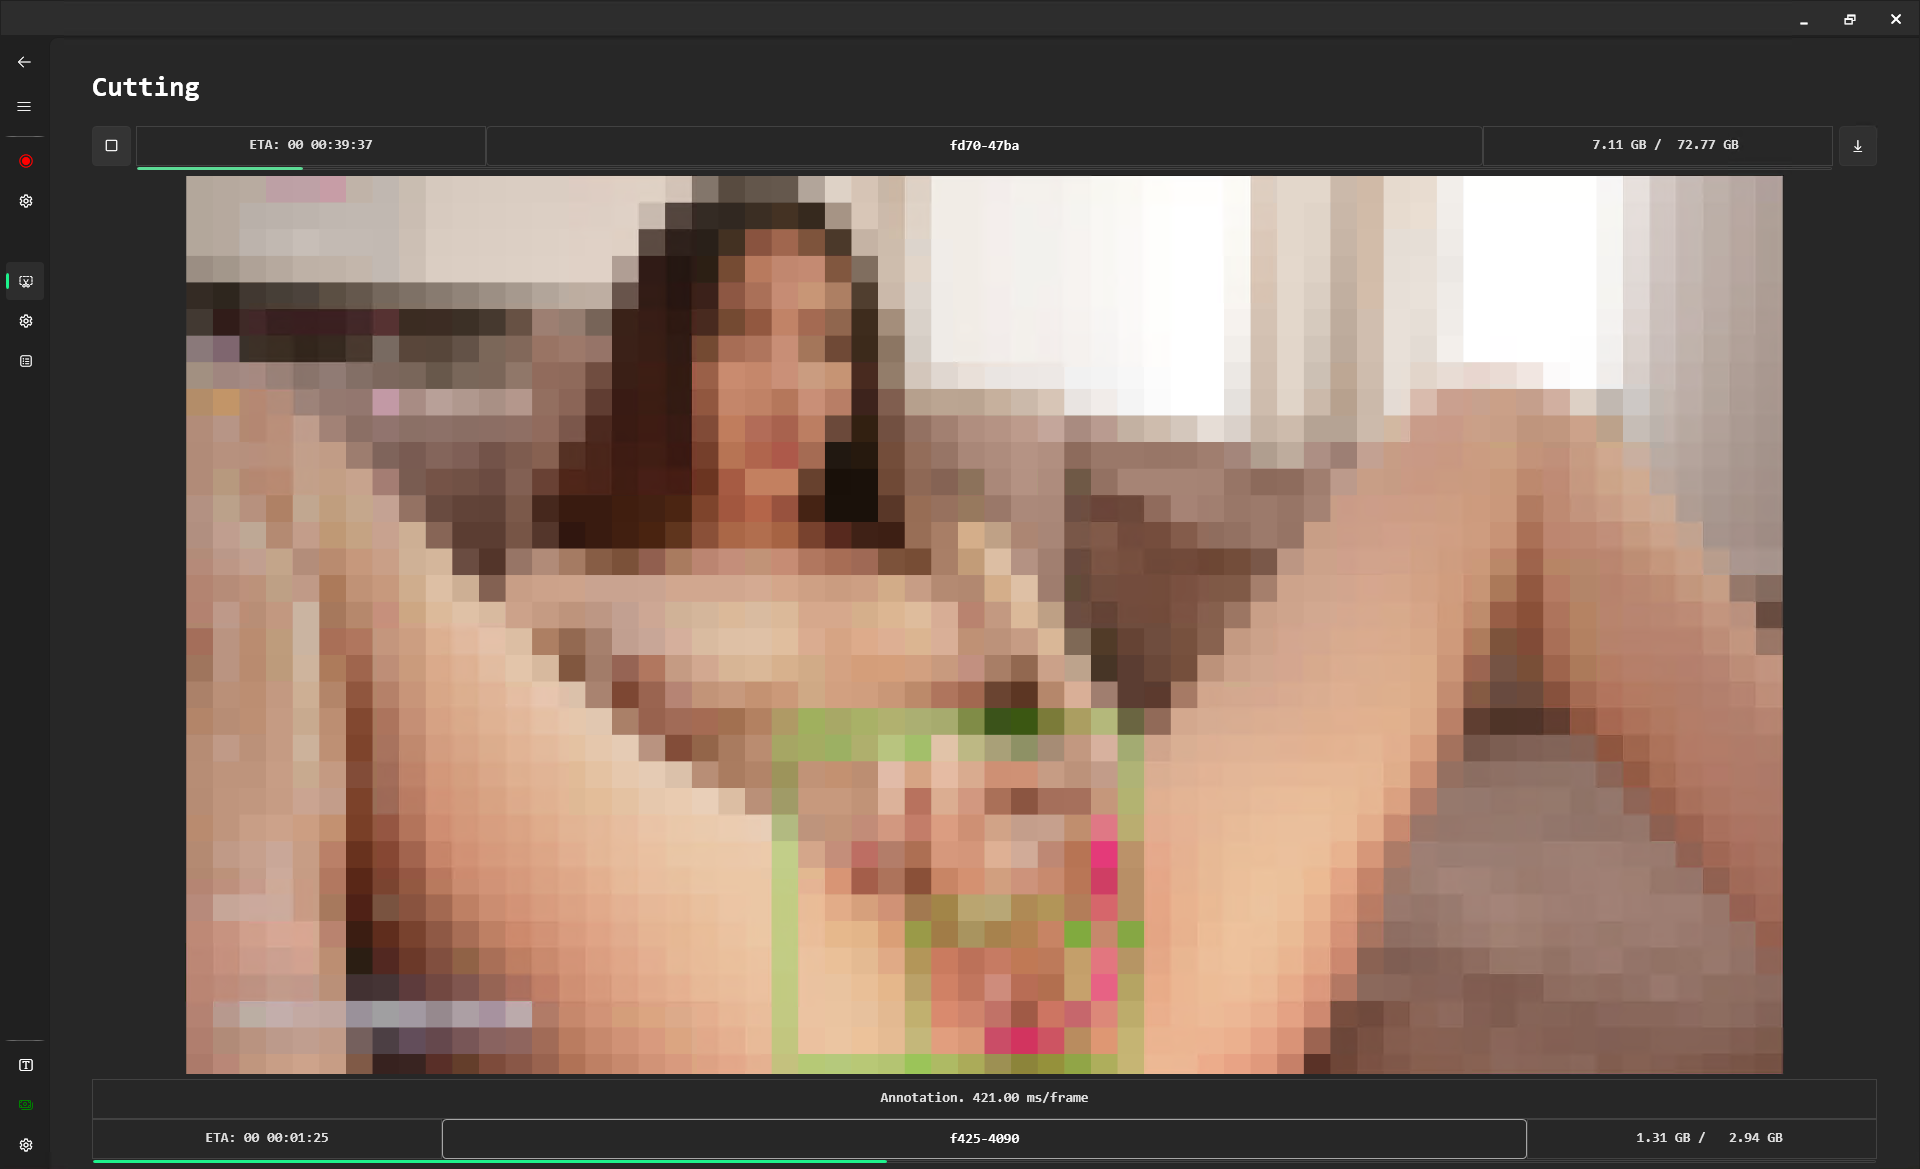
- AI detection — the module steps through the video, grabbing a frame every 10–15 seconds (configurable via Post-Detection Skip and No-Detection Skip). Each frame is run through the detection model; frames at or above the confidence threshold (default: 33%) are marked.
- Clustering — consecutive detections are grouped into events. A new clip starts when no detection occurs for the Detection Event Split Gap (default: 240 seconds). A padding buffer (default: 120 seconds) is added before and after each event so action that starts early or ends late isn't cut off.
- Cutting — each detection cluster is cut into its own clip. Clips shorter than the Minimum Clip Duration (default: 5 minutes) are discarded. Everything without detections is dropped.
- Convert & clean up — clips are saved to the output directory, optionally converted to MP4, and the originals are deleted unless you enabled one of the retain options.
Content modes
Via Process Only Specific Content in the Cutting Settings:
- Mode 1 (off) — both detection classes ("pussy" and "bating") produce clips.
- Mode 2 (on) — only "bating" detections produce clips.
Dry runs
To test the process without losing anything, enable Retain Original Videos (and optionally Retain Rewritten Videos). The module then performs one full processing cycle, keeps every source file, and stops. Test on a small subset rather than your whole collection: copy a few performer folders into a separate test directory, point the input there, and check the results before letting it loose on the real collection.
Cutting Settings
Every knob of the cutting pipeline, grouped the same way as on the Cutting Settings page.
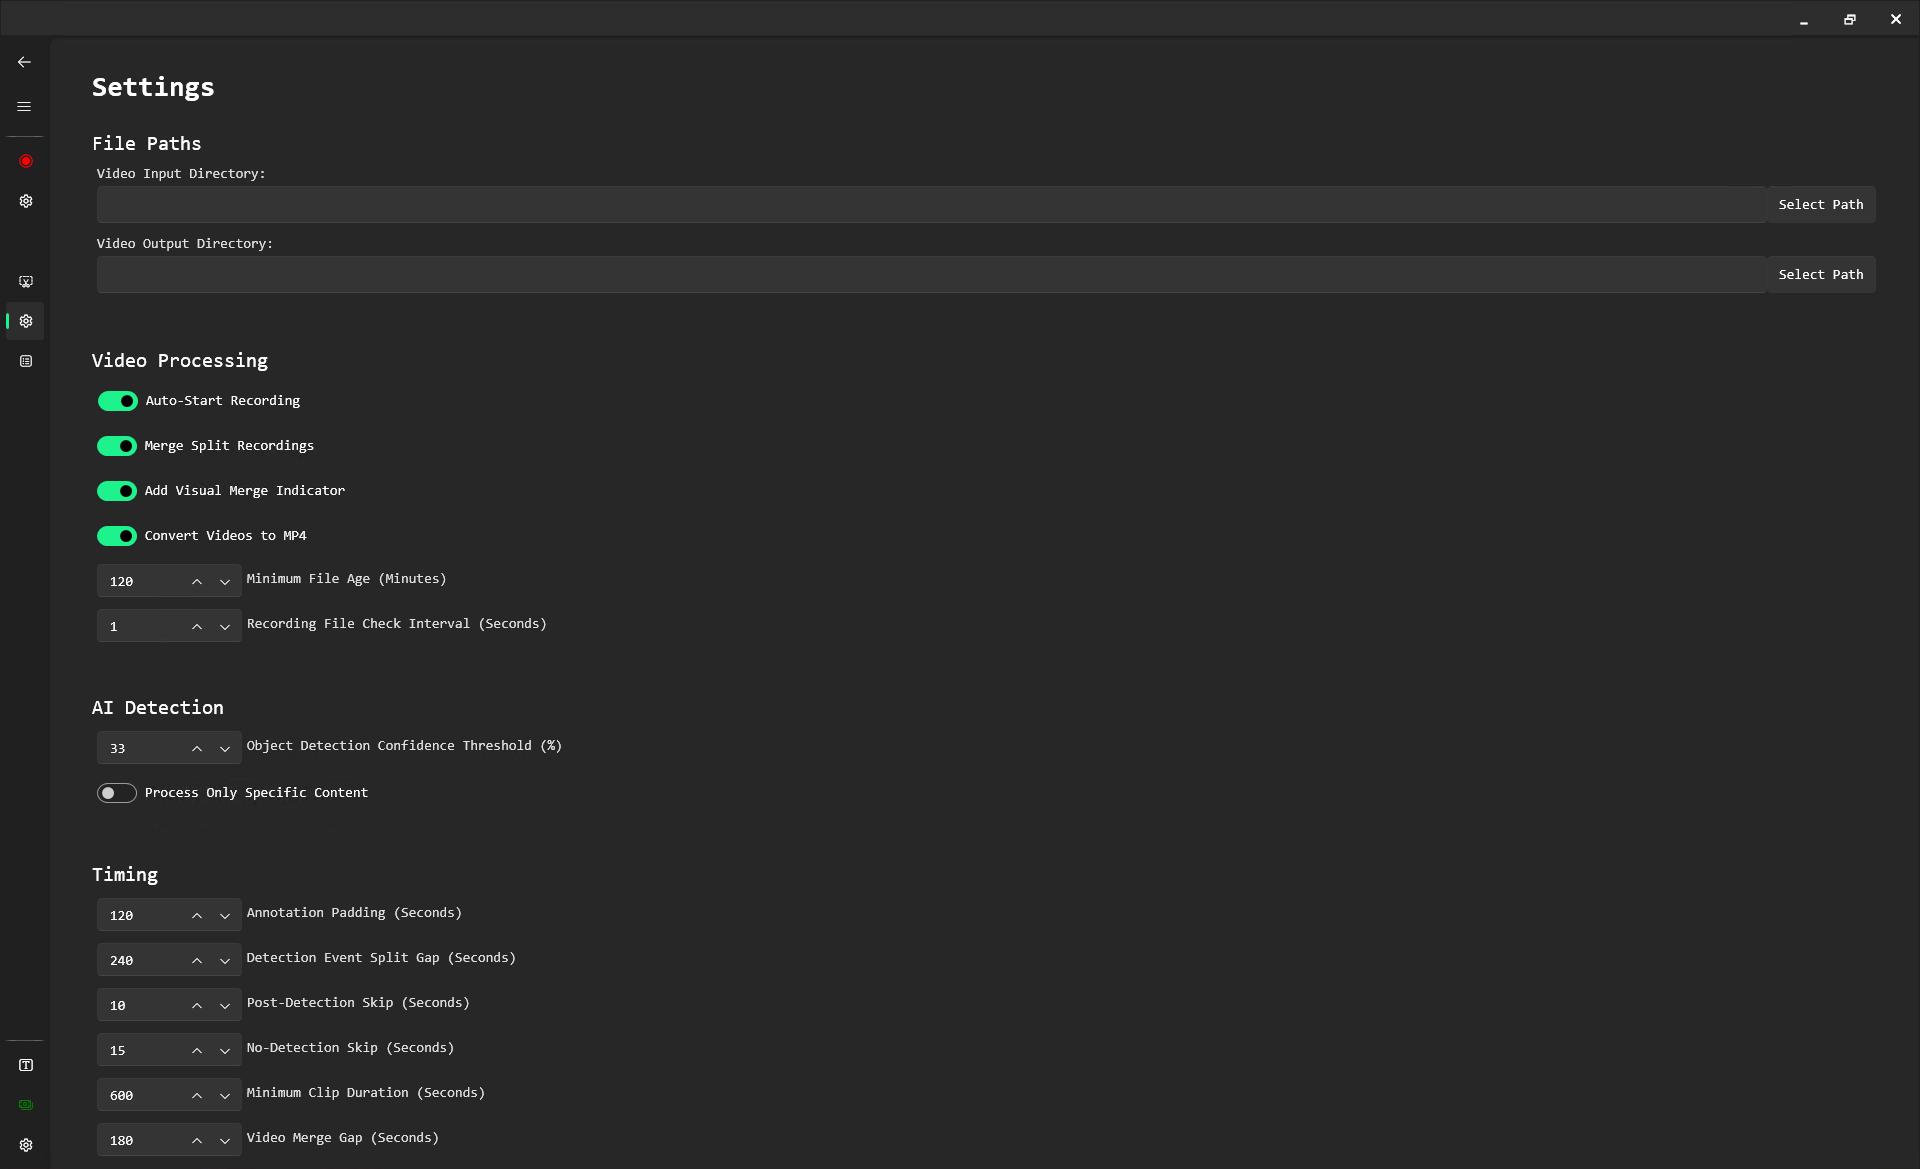
File Paths
| Setting | Default | Description |
|---|---|---|
| Video Input Directory | (blank) | The folder with your original recordings to process. If left blank, it automatically uses the Recording module's Video Output Directory — the automatic record-to-cut pipeline works out of the box. |
| Video Output Directory | (blank) | Where the processed highlight clips are saved. If the configured folder cannot be
created or accessed, the app falls back to _CutVideos next to the
application (this fallback folder is cleared on startup). |
| Failed Video Directory | (blank) | Videos that repeatedly fail processing (e.g. frame read failures) are moved here. Leave blank to disable. |
| Training Images Output Directory | (blank) | Saves the original frames used for detection — handy for building custom training datasets. Leave blank to disable. |
| Annotated Images Output Directory | (blank) | Saves frames with detection overlays drawn on them, so you can see exactly what the AI detected and with what confidence. Leave blank to disable. |
| Force Export Images Output Directory | (blank) | Folder for forcibly exported images with detection overlays. Leave blank to disable. |
General Processing
| Setting | Default | Description |
|---|---|---|
| Auto Start Processing | off | Starts processing automatically when the application launches. |
| Process Files In Reverse Order | off | Processes the newest files first instead of the oldest. |
| Minimum File Age | 480 min | Files must be at least this old (default: 8 hours) before they are processed. Prevents cutting a recording whose show is still live and may produce more split parts. |
| Recording File Check Interval | 180 s | How often the input folder is scanned for files that are done being written. |
Regular Processing
| Setting | Default | Description |
|---|---|---|
| Enable Split Recording Merging | on | Merges video files that were split during recording, based on their start and end times. |
| Add Visual Merge Indicator | on | Inserts a visual indicator (loading circle) between merged clips so you can see where the recording was split. |
| Rewrite Original Videos To Fix Frames | off | Fixes missing frames in live recordings so frame numbering and detection timestamps stay perfectly aligned. |
| Retain Original Videos | off | Keeps the original files after processing (dry run). Stops the cutting process after one cycle. |
| Retain Rewritten Videos | off | Keeps the rewritten/merged intermediate files. Also stops processing after one cycle. |
| Enable Local Video Copy | off | Copies videos to a local folder before annotation and cutting — much faster when the input lives on a network share, but needs at least 200 GB of free local disk space. |
| Convert To MP4 | on | Converts the finished clips to MP4. |
AI Detection
| Setting | Default | Description |
|---|---|---|
| Object Detection Confidence Threshold | 33% | Detections below this confidence are ignored. Raise for fewer false positives, lower to catch more borderline content. |
| Process Only When Specific Content Detected | off | Creates clips only from "bating" detections (Mode 2), ignoring the "pussy" class. |
| Hardware Acceleration | on | Uses your NVIDIA GPU for detection — dramatically faster than CPU. Only takes effect when a compatible CUDA GPU is actually detected; otherwise it silently falls back to CPU processing. Restart the application after changing. See the GPU Setup guide. |
| Model | default.onnx | The detection model used for cutting. Custom models go into the
CustomModels folder and must not be named default.onnx.
|
Timing
The first four timing settings have interactive visualizers directly on the Cutting Settings page, so you can see on a timeline how padding, split gaps, and the two skip intervals interact before committing to values.
| Setting | Default | Description |
|---|---|---|
| Annotation Padding | 120 s | Extra seconds added before and after each detection cluster, so action that ramps up early or ends late is kept. |
| Detection Event Split Gap | 240 s | If no detection occurs for this long, the current clip ends and the next detection starts a new one. |
| Post-Detection Skip | 10 s | After a positive detection, jump this many seconds ahead before sampling the next frame. |
| No-Detection Skip | 15 s | When nothing is detected, jump this many seconds ahead — larger steps make processing faster but coarser. |
| Minimum Clip Duration | 300 s | Clips shorter than this (default: 5 minutes) are discarded instead of saved. |
| Video Merge Gap | 180 s | Recordings whose metadata timestamps are within this gap are merged into one video before detection. Only files from the same performer subfolder are merged. |
Blacklist & Training
The Blacklisted Performers group lets you exclude specific performers from AI processing. Files from blacklisted performers can be moved straight to the output folder without cutting (Process Blacklisted Performer, default: on) — with their own independent copies of the merge/rewrite/retain/MP4 options, so you can, for example, still merge and convert their recordings without any AI cutting. Add usernames to Blacklisted Performer Names to use it.
| Setting | Default | Description |
|---|---|---|
| Process Blacklisted Performer | on | Moves files from blacklisted performers to the output folder without AI processing (still applying the blacklist group's merge/convert options). |
| Blacklisted Performer Names | (empty) | The list of performer usernames to exclude from AI processing. |
| Export Images Only (Training) | off | Exports frames from videos for AI training without cutting anything. Stops the process after one cycle. |
Like the Recording Settings page, the bottom of the page has Show Advanced Settings to reveal options intended for experienced users, and Highlight Advanced Settings to visually mark that section.
Tips & Related
- GPU acceleration — an NVIDIA GPU with CUDA/cuDNN makes AI detection many times faster for both modules. Follow the GPU Setup guide.
- Recommended pipeline — Recording output directory = Cutting input directory, Cutting output = your library folder, and Stash pointed at the library for browsing. Set the Custom Web Search URL to your Stash instance for one-click lookups from performer tiles.
- Weak Mode — leave it on for weak hardware (recording works fine without AI); turn it off on capable machines to unlock AI Bandwidth Save recording.
- Test first — use the retain options for a dry run on a handful of files before processing a big archive.
- Storage — this is not a lightweight recorder. The tool shuts down if less than 1 GB remains on the primary disk; keep plenty of headroom, and 200+ GB free if you use Local Video Copy.
- Accurate system time — critical for recording and for the metadata-based merging in the Cutting module.
- More detailed step-by-step tutorials will be published here over time. For questions, see the FAQ or contact support.